This post for a Rolling Planter Box contains affiliate links. I make a small portion when these links are used, at no additional charge to you.
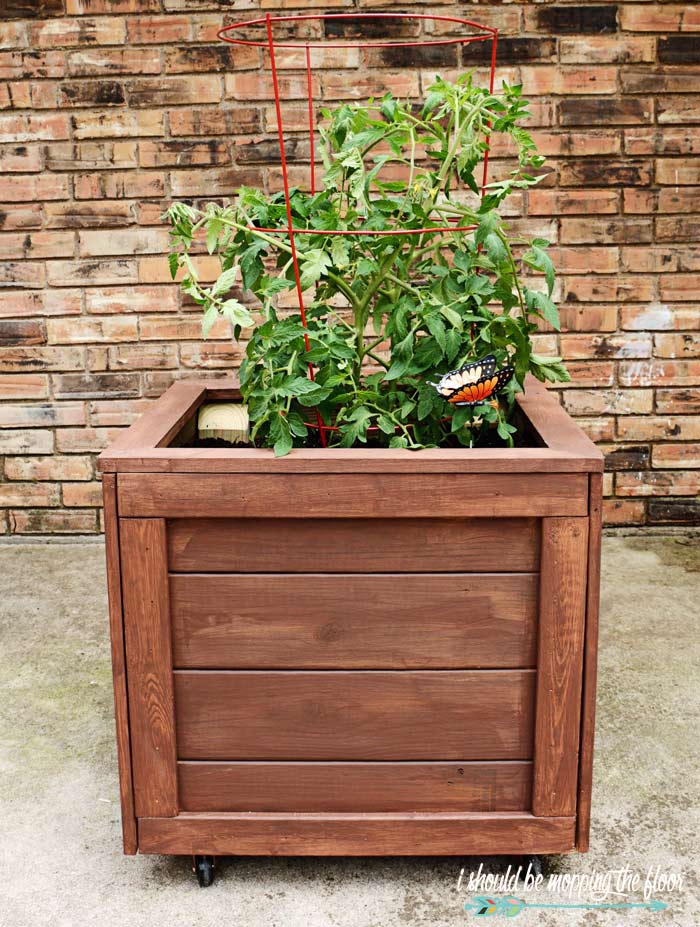
This Rolling Planter Box is perfect for any patio or garden area. It works perfectly for veggies, herbs, or flowers. And the best part? It rolls wherever you want it. See our complete tutorial how to make a rolling planter box below.
I'm really excited about this rolling planter box. I've had smaller rolling versions in the past, but this one is the coup de grâce to all other planters. The king daddy, y'all. It's large enough to have a big ol' tomato plant with roots that will grow nice and deep. I worked with my dad to create this one after realizing I really needed a large mobile planter. Where we are located in Texas, our summers go well into the triple digits. My tomato plants have never lasted longer than July because of the extreme heat. When we lived up in the panhandle, I had amazing tomatoes all summer long and well into September (and I miss them). And in Texas, you just have to have homegrown tuh-mate-uhs (that's how we pronounce it down here) with your summertime meals. Or really, just one ripened tomato and a salt shaker seems to work out pretty well, too, (wink). Now that we're down in central Texas, a rolling planter box like this allows me to move my plants around the yard, depending on the heat. I can roll them right up into the shade to protect them on the scorching days. Or even get them out of a crazy hail storm when those pop up. If you live in a colder climate, these would be great to protect plants during the winter...just roll them into the garage (I've overwintered my peppers like this, which results in an early crop the following year).Our step-by-step tutorial can help you create a Rolling Planter Box of your own, too.
How to Make a Rolling Planter Box
I'm seriously in love with this new planter...tomatoes, here we come! I've already practiced wheeling it all over the place...and I'm wanting a few more, now. I love that its design will be resistant to weeds, as well. Check out how we built this rolling planter box with our tutorial below.
DIY Rolling Planter Box Supplies
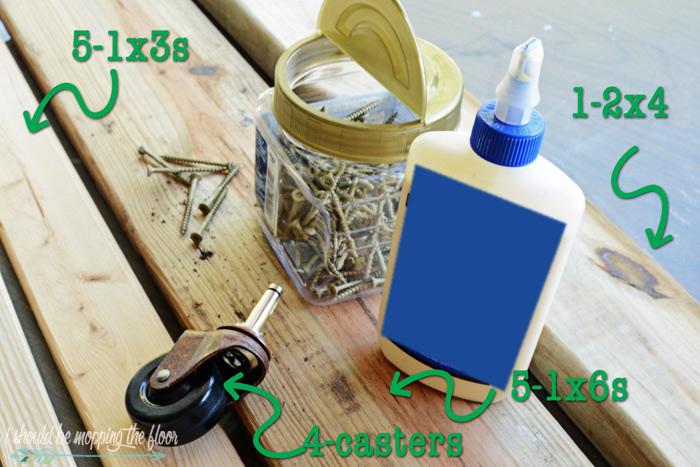
- galvanized decking screws (you'll want galvanized since this planter will be exposed to the elements)
- wood glue
- 4- 3" swivel casters (each should be able to support at least 100 pounds)
- I found ones similar to the ones we used here on Amazon.
- 5-1x6 boards (we used treated decking boards upcycled from another project)
- 1-2x4 board (treated)
- 5-1x3 boards (this is for the trim; treated is good, but not mandatory is you finish it later)
- (not pictured) 1 additional treated 1x6 board for the floor of the planter
You will also need a compound miter saw. You could do this by hand, but it would be one heck of a job, y'all. Rent or borrow a miter saw if you can. It makes very quick work of the cuts.
Just FYI, we used decking boards for our rolling planter box. When I told my dad about this idea, he instantly wanted to upcycle the lumber he had from a deck he put in at their house (and then pulled out since he didn't love the design). He's eighty years old and building and removing decks, y'all. He can run circles around me.
Just FYI, we used decking boards for our rolling planter box. When I told my dad about this idea, he instantly wanted to upcycle the lumber he had from a deck he put in at their house (and then pulled out since he didn't love the design). He's eighty years old and building and removing decks, y'all. He can run circles around me.
Cutting the Boards for a Rolling Planter Box
- Start by cutting your main boards (the 1x6s and 2x4s). They will make up the main piece.
- You will need twelve 24" boards and eight 22" boards if you're building the 2'x2'x2' box.
- You'll also need four 2x4 boards cut to 24".
- After cutting, we mitered one end of each 2x4, just to give them a finished look since they "peek" out of the planter on top. You definitely want 2x4s instead of the 2x2s that a lot of planters are made from...you will need the extra support for your casters.
- Cut two additional 22" 2x4s (you should have enough board left) that will be used to support the floor of the planter.
Assembling Your Rolling Planter Box
- You'll start by assembling two of the sides with four 24" boards and two of your cut 2x4s.
- Use your galvanized screws to secure the boards to the 2x4.
- We purposefully bought skinnier screws than usual so we wouldn't have to pre-drill our holes (my dad's a genius...we didn't split a single piece of wood nor waste any time having to pre-drill). Again, create two of these boards.
- Then you will connect your two sides with four 22" boards on each side. It's helpful to have a second person here to make sure the boards are lined up "tight" while the other does the screwing in.
- Add those additional 22" 2x4 boards into your now connected box, at the bottom.
- Screw them into the bottom boards of the box sides. These are designed to support your floor.
- Add your four additional 24" boards on top of those 2x4s (you will need to notch two of the boards to fit around the 2x4 supports, we just used the miter saw to notch ours out).
- Your actual box is now complete and ready for trim.
Adding Trim to Your Rolling Planter Box
- You will cut eight 24" pieces of the 1x3 boards and eight 22" ones. We didn't miter our corners here, but if you're feeling fancy, go for it.
- We just attached these with simple nails. You'll only do the trim on the outsides of the box now. We'll finish the top in a bit.
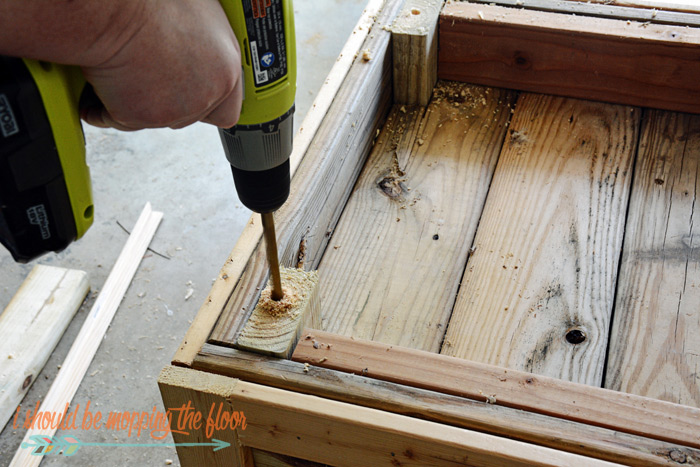
- Turn the box over and pre-drill your holes for the caster sockets.
- Make sure these are drilled into the 2x4s.
- Add your wood glue to each of the pre-drilled holes.
- Use a rubber mallet to pound the caster retainers into place (these come on the casters and just remove to be placed into the space they're needed). See how ours look in the above photo.
- The construction of this piece allows for adequate drainage. However, if you feel you'd like more, drill a couple of 1/2" holes in the bottom of the planter now, while the DIY planter box is flipped over.
- Then screw the casters into their retainers by hand (they just drop in and twist to tighten).
- Your box is really heavy now, but go ahead and turn it right side up to finish the top trim. This is the only part we mitered.
- We cut four more 1x3 pieces to form a square to sit on top of the box and cover all of the layers of wood.
- Just nail these into place once cut. I did give them a good sanding once in place.
Finishing Your Rolling Planter Box
- I finished the rolling planter box off with an outdoor stain and seal product. Since we used both new and upcycled wood pieces, it gave it a more uniform look.
- I used this Thompson's Water Seal from Amazon here.
- I did not stain the inside since the wood...I didn't want anything leaching into my soil.
Come on, tomatoes! We've got our salt shakers ready for ya.
More DIY Planter Ideas
- We created these Sturdy DIY Planted Posts so we could use what they're planted into for flowers, too. This is actually our most popular post here on I Should Be Mopping the Floor.
- These Criss Cross Outdoor Planters from Centsational Style are some of my favorites in the blog world.
- Love this Square Planter Box from Two Feet First. It's such a neat design.
- Our DIY Window Box was really fun to put together, as well. It's the perfect spot for seasonal herbs. You can also see how we constructed them in the video tutorial below.
Do you have a spot where a rolling planter box would work for you?


We live in AZ and could absolutely use a moveable planter box. #client
ReplyDeleteThey're super handy in warm climates for sure!
DeleteGreat project for summer! But be careful about using "treated" wood in planters where you plan to grow food. Chemicals from pressure treated or stained wood will eventually leach into the soil and into your veggies.
ReplyDeleteGreat tip, Nancy. Thanks for sharing.
DeleteThis is beautiful and exactly what I want for my own house, although I'm not going to lie--I'm totally intimidated by such a project. Still, lovely eye candy.
ReplyDeleteThank you so much, Meg!
DeleteLove this tutorial. I am pinning to my Gardening/outdoors board!
ReplyDeleteThank you so much, Jennifer! I appreciate that.
DeleteOur yard is in great need of some upgrading. This would be great for our patio. Also, girl, you are looking too fabulous for gardening! ;) LOVE your hair!
ReplyDeleteHa! Thank you so much, Kristy! I really appreciate that.
DeleteHey great project just wanted to let you know. I was building this and following your directions and realized Thad you had some of you directions backwards. You want to screw the 22” boards to the 2x4’s first. then the 22” on the sides, Or else your no going to have a square box. Made this mistake first putting it together and know something wasn’t right so just FYI you might want to make a correction to you instructions. Still a great project and heavy duty planter. Thanks, Kevin
ReplyDeleteThank you so much for letting me know, Kevin. It's much appreciated.
DeleteAs I am reading this - I was adding up in my head and also noticed this!
DeleteI don't see the overall length of each need size - the total sq feet for 2x4, 1x6 and 1x3 - as in how much lumber to buy. Since lumber comes in different lengths, trying to figure this out.
ReplyDeleteThey're listed in the supplies list above, along with the photo right above the heading, "DIY Rolling Planter Box Supplies" which has the dimensions of the lumber you'll need.
Delete5-1x6 boards (we used treated decking boards upcycled from another project)
1-2x4 board (treated)
5-1x3 boards (this is for the trim; treated is good, but not mandatory is you finish it later)