This post for a DIY iPhone Projector contains affiliate links. I make a small portion when these links are used, at no additional cost to you.
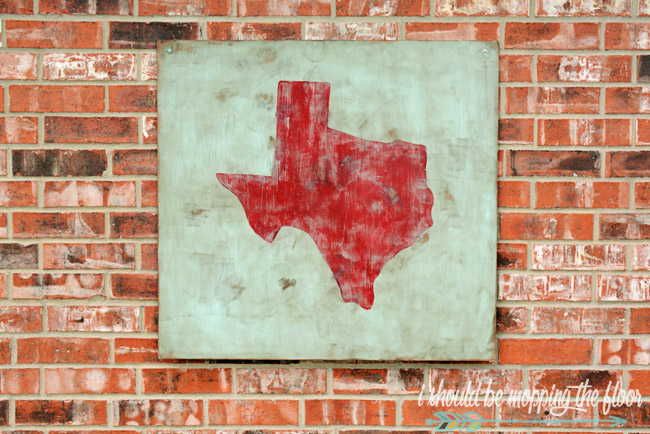
This DIY iPhone Projector helped me make this state art I'm sharing below...and countless other pieces since. And any smart phone will work. Once you construct your own projector, the projects are endless.
My husband is a high school principal. Once or twice a year, I'd get a wild hair and need an overhead projector for a project...or ten. He'd give me the whole "do you have any idea how hard those are to track down these days...nobody uses them anymore?!?". And I'd pretty please my way into a campus-wide hunt for that one lonely overhead that a teacher had hidden in the depths of their closet somewhere. It was getting to be a bit of an ordeal to come by one of these projectors, ya know? When my friend told me she heard about people making a projector with an iphone and a cardboard box, I was all over that, y'all. Check out how I made my own version below.
DIY iPhone Projector
The main project (the state art) that I shared below is just one of the many projects you can create with your own DIY iPhone Projector. Once you start creating, you just can't stop. In addition to this projector tutorial, I also shared a simple painting technique that I used on this piece.
This projector could be used for lettering, too. Really, the possibilities are pretty endless.
I'm super happy with how this state art turned out. There are several tutorials out there for these kinds of cardboard box projectors, but this is just what worked best for me. Also...I'm a native Texan, so it's all I know. But, do other states celebrate their "outline" like we do? I'm just curious.
How to Make a Smart Phone Projector
Supplies
- small cardboard box
- box cutter
- printed transparencies
- You can get transparencies made at any copy store.
- If you have an ink jet printer, you can purchase these ink-jet friendly transparency sheets here on Amazon and print your item at home.
- An alternate idea is to buy blank transparencies (grab them here on Amazon), then print what you're wanting to trace onto regular paper. Then lay a transparency sheet on top of your printed item and trace it out (I'd use a Sharpie for this, so you don't erase it accidentally).
- pencil
- tape (blue painters' tape works well on cardboard)
- smart phone with a flashlight
- I can't speak for other phones, but I really think an iphone does have a brighter light than others...if that option is available to you, I'd go with it.
You'll also need a blank slate to project your image onto. I went with a scrap board from our garage. I'm a scrap wood hoarder. This piece was from the board and batten we did in my son's room two and a half years ago (see that project here). If you want to get super technical, it's 5 MM 4x8 Underlayment...better known as insulation, y'all. I wanted something really lightweight since I was going to hang it from the mortar on our house's exterior.
This project cost me absolutely nothing, too, since I had everything on hand.
DIY iPhone Projector Directions
- Using a box cutter, cut a small square in one end of your box.
- Tape your transparency image going the wrong way (guess how I figured that one out?) over the opening.
- Make your room as dark as you can: turn off all of the lights and close your drapes, etc.
- Place your phone into the box on the opposite end of the transparency with the flashlight app turned on and projecting outward through the transparency.
- You may need to tuck a couple of books under your box to get the correct projecting angle...just play around with it until it works for you.
- Project your image onto your surface.
- Now you can transfer your image with your pencil.
Weathered Paint Technique
I thought it might also be helpful to share the painting technique that I used for my state art. It's a simple and forgiving method that anyone can do.
Supplies:
- base coat of paint (I used exterior paint for this, but it's not necessary if you seal it...plus you want the weathered look, so regular paint can add to that look over time since it's not as durable)
- paint for your object (I used acrylic craft paint that I had on hand)
- sandpaper in various grits (I like to use a multipack like this pack here on Amazon.)
- palm sander (optional, but gets the job done a lot faster)
- I've used the same palm sander for over 20 years. It's a Black and Decker. I found the latest version of it here on Amazon, if you're in the market.
- tack cloth (grab a pack here on Amazon)
- wood stain (I love this Minwax Dark Walnut stain that you can grab on Amazon.)
- old t-shirts or soft cloths for stain application
- paper towels
- clear sealer (I like this one from Amazon)
Directions
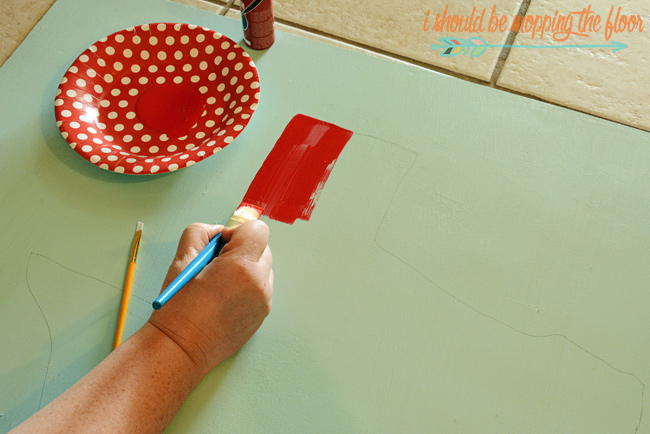
- I painted the base of my board with an outdoor paint that I had on hand (you can see how it was originally used on our porch ceiling here). The color is called Crystal Aqua from Valspar.
- Let your base color dry completely before tracing your transfer onto your piece.
- After the image is traced (using your new nifty DIY iPhone Projector), fill it in with acrylic craft paint.
- You'll be weathering the paint, so perfection isn't necessary.
- After the paint dries, rough up the entire piece with a sander. If you don't have a sander, simply use regular sandpaper (it will just take a bit longer).
- And then remove the dust with tackcloth.
After you've removed all of the dust with the tackcloth, you'll deepen the weathered look by going over the piece with stain.
- This is the part of the process that requires quick work (you don't want the stain to sit on your piece too long): wipe it on and then wipe it right back off.
- The longer you let the stain "sit" on the piece before wiping it off, the dirtier the piece will look in the end (I actually don't mind that look, but start out removing quickly to get a feel for how the process works and the amount of weathering you prefer). You can kind of work the stain into the piece as much as you like...just add a little elbow grease.
- One other factor to consider is temperature. When I use this technique during our 100+ degree summers, I have to work really quickly to wipe my stain off or it will "set" too fast and not be easy to wipe back off. I used an old t-shirt for this.
- In the past, I've used paper towels to wipe off stain. But, good gravy, have you seen some of the brutal comments on my February post about paper towels/kitchen cleaning routines? Ummm...yeah. I love the earth, y'all. I promise. But after that post, I kind of wanted to sit in the corner and rock myself for a while for using paper towels to clean with at times. Shake it Off was on repeat that week. I digress.
After you're happy with the amount of weathering on your piece, apply a coat of sealer and allow it to dry.
I hung this piece in our new firepit area in the backyard.
Here, you can see it in the backyard. And yes, we intentionally put the firepit that close to the house (again with the comments from past posts and on social media). I promise we're not idiots. This actually is within our city's code. Since we built this as a non-permanent piece (purposefully), the distance is legit. We're aware of the risk...but...there's the hose right there. We hose that baby off every time we have a fire in it. It's all good. Promise. Just come have a s'more with me already.
Click here to see the DIY Planted Posts we built. They're perfection for hanging our vintage patio lights from. We've also added some fun hanging baskets to them as well.
More DIY Projects
- My DIY Crate tutorial has been a reader favorite for many years. It's a practical tutorial that has so many uses.
- And my recent Wall Mounted Plate Rack tutorial has to be one of my favorite projects of all time. It's a great way to showcase my mom's china.
- This Wood Mosaic Tabletop from Abbots at Home is truly stunning...what a fun piece!
- And this $5 Blanket Ladder is a practical way to not only store, but also display your pretty throws, quilts, and blankets. It's from Her Tool Belt.


I laughed at all of that, far too hard. Thanks! I needed that.
ReplyDeletewww.chelleslittlecorner.blogspot.com
Nice project, well done but, what I loved even more is your super-cool projector.
ReplyDeleteFun post, too.
Did I mention your super-cool projector hack?
Yes?
Doesn't matter, I loved it. :)
Such a great idea, so creative! Love it! :-)
ReplyDeleteCathy@threekidsandafish{dot}com
Not sure where my comment went but I wanted to say I love this project - very Texas Festive! I live in the country in North Texas and this would be a neat addition to our own fire pit area. I like the gravel too!
ReplyDeleteCarole @ Garden Up Green
Hello Gorgeous! This looks incredible! Thank you so much for sharing it with us. Pinned and tweeted. I hope to see you tonight at 7 pm, so we can party with you! Lou Lou Girls
ReplyDeleteThis is great! And since we are Texas natives living in CO., I need to do this.
ReplyDeleteAnd sometimes, people just suck. We use paper towels for cleaning. And leave a roll in the bathroom for drying hands. Cuts down on germs. And yes, my husband buys big boxes of rags and towels for his shop and I snag those when I need them.
How big is your board?
ReplyDeleteIt was 3'x3'.
Delete