This post about How to Paint a Porch Floor contains affiliate links. As an Amazon Affiliate, I make a small portion when these links are used, at no additional cost to you.
This is another post from my painting blog that I'm bringing over here as I prepare to close that site.
Got a "well-loved" patio? This step-by-step tutorial for How to Paint a Porch Floor gives a simple-to-follow method for bringing your outdoor patio back to life. At the bottom of the post, I've also included all of the paint colors we used here.
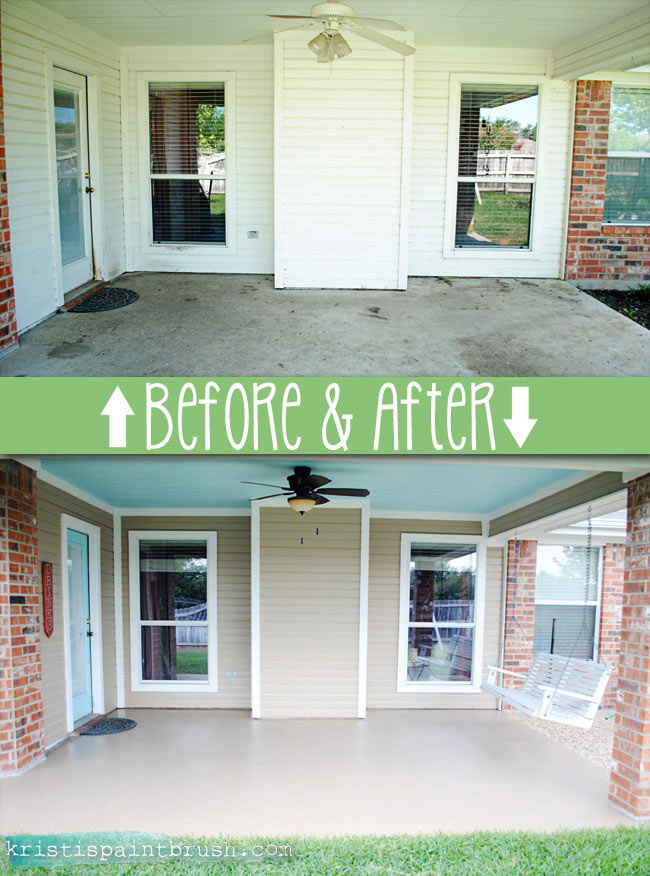
Last summer, we worked like crazy to turn our really neglected back porch into a place we can actually enjoy (including a new DIY Firepit area, too). One of the first things we did was paint. From the ceiling down...we were amazed at how much paint transformed the porch area. Check out below our DIY on how to paint a porch floor.
Painting Your Porch Floor

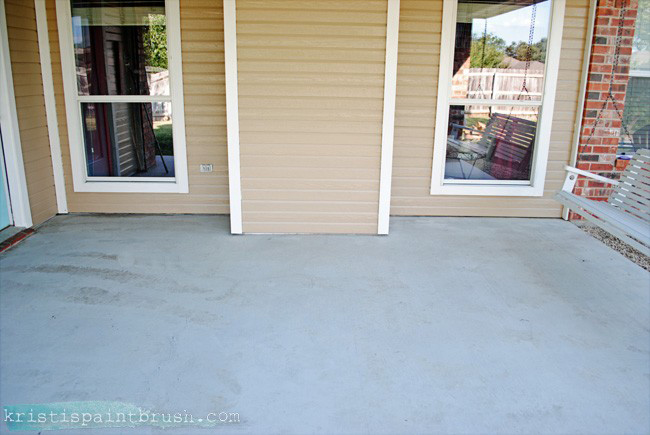
There was actual furniture out here up until last spring when I got a wild hair and sold it all in a garage sale...in anticipation for re-doing the area. From March through July (when we finally had time to actually start this makeover), this space sat empty. It seemed to get messier and dirtier without us enjoying the area like we usually do around that time of year. Bleh. See...even our dog didn't want to stay.
How to Paint a Porch Floor
Prep work is the name of the game for this particular project. Try not to cut any corners, if you can. It's a long process, but not a difficult one...and the reason it's long is due to multiple drying times.

Supplies:
- power washer (borrow one or grab one here on Amazon)
- concrete cleaner/etcher (this is combination product)
- We used Valspar's Fast Prep which is available at Lowe's. But this one from Rustoleum on Amazon has good reviews.
- We used about one and a half gallons, but our porch is on the smaller size.
- heavy duty push broom (for cleaner/etcher application)
- We already had one of these, but you can get a good one here on Amazon.
- oil-based porch paint
- We used this one from Valspar (only white is available on Amazon, but we found the Universal Umber color we used at Lowe's)
- extended length paint roller (your back will thank you)
- paint tray
- cut-in brush
- I swear by this Wooster Shortcut Brush that I've used for over 15 years.
Directions:
- Start with a thorough power wash of the entire area.
- Then, let that dry completely.
Our patio was probably dirtier than most. We had some irrigation issues which we also resolved over the summer by adding in a pea-gravel area for our fire pit. That area was previously quite muddy because of our French drain's location. By putting in the gravel area, we've totally eliminated the mud problem. Which makes a world of difference in keeping the patio clean. No more muddy paws!
This next step is pretty critical in getting paint to adhere to a porch. This is actually the second house that we've done this porch-painting thing to. This prepping chemical eats off the top layer of your concrete... allowing it to open up a bit and absorb the paint that you apply to it.


- Apply the cleaner/etcher with your stiff-bristled push broom all over the entire area.
- Since you may be using a different brand than we did, be sure to follow the directions on your product's bottle.
- Allow this to dry. Then spray off your porch (we just used a hose, per the directions on our product).
- After it's sprayed, allow 24 hours of dry time.


- After the 24-hour drying period, you can apply your actual paint with a roller.
- Start by cutting in all of the edges first with your smaller brush.
- Then roll the entire area (we rolled the furthest area first, rolling ourselves right into the house, for drying purposes).
After the paint is down, let it dry for as long as you possibly can before setting foot on it. We gave ours an entire week to cure (not an easy feat with two dogs that come out that back door to do their thing). We had to take our dogs to the front yard that whole week...but it was worth it. This step definitely requires patience. Make sure to also check your forecast for a dry and sunny week before starting this particular project. I feel like rain could really interfere and mess up adhesion.
 We're really happy with how it turned out. So much fresher and cleaner. Since this photo, we've added a dark brown teak patio table in front of the fireplace backside, going the long way. I've also added pillows and signs and other fun around the space. You can see the entire makeover of our backyard here.


Porch Paint Colors
The paint colors here went a long way for this new look. Here are the ones we used:
- A. The door and ceiling color is Valspar's Crystal Aqua
- B. The trim color is Valspar's Pale Bloom
- C. The siding color is Valspar's Au Lait Ole
- D. The floor color is Valspar's Universal Umber

Looking for More Backyard Projects?
- If you're not wanting to get this involved with painting your porch floor, I also have a much-simpler Concrete Patio Cleaner Recipe that truly works wonders, as well. It's a great alternative.
- Our DIY Tin Can Flower Garden is another popular reader post. It's a great upcycle project to get your entire family involved in.
- Be sure to also check out How to Build Window Boxes for an added splash of floral color (or herbal fun) on any of your windows.
- This DIY Balcony Railing Table from The Handyman's Daughter is so clever!
- And this DIY Turtle Topiary from H20 Bungalow is seriously the cutest!


Wow! This turned out gorgeous. It looks so clean and inviting. I bet it is really nice with your furniture and some plants/flowers!
ReplyDeleteWow! This turned out gorgeous. It looks so clean and inviting. I bet it is really nice with your furniture and some plants/flowers!
ReplyDeleteI remember you working on this to do! The outcome looks so great! Amazing the difference some new paint can do to make a space just pop! xx, b
ReplyDeleteI ABSOLUTELY LOVE it. We plan on painting our concrete soon. Swooning over the Hiant blue ceiling - really really want to do that here. Well done my friend!!
ReplyDeletethat looks so good, and i love the siding color, too. enjoy!
ReplyDeleteb
Wow, what an amazing difference!! I have used porch paint indoors, but oddly enough, never outdoors where it belongs. ;) I love the way it turned out!!
ReplyDeleteThese were great tips. I really want to to redo our porch floor. It has all kinds of cracks and stains. I guess that is a good thing, because it means that it is getting a lot of use. However, I wish that it was a little nicer. I'm sure these tips will really help me in the process of making my porch look new again. http://www.rmmaterials.com/flagstone.htm
ReplyDeleteHi! currently, i'm working on remodeling the back porch on my mother's house and i was really unsure on how to do this on my own-- thank you so much for sharing your knowledge ♥
ReplyDeleteI'm so glad this was able to offer you some ideas and inspiration! Thank you bunches for stopping by! <3
Delete