This post for Rustoleum Oil Rubbed Bronze Paint contains affiliate links. I make a small portion when these links are used, at no additional cost to you.
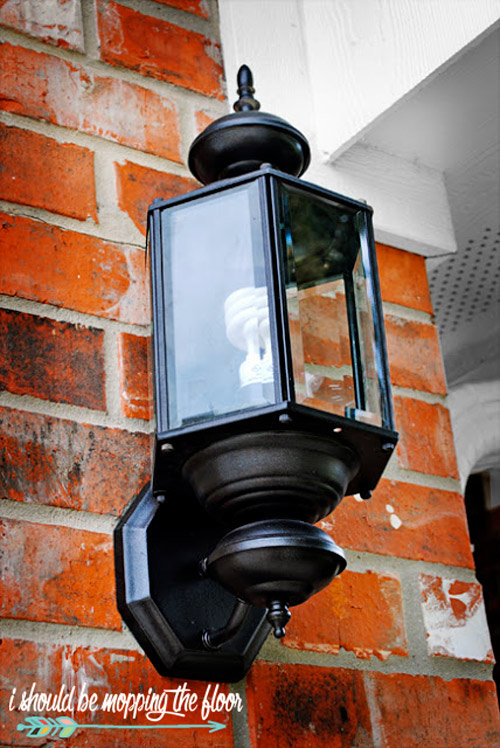
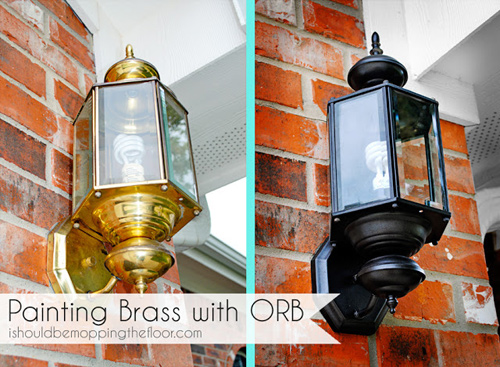
We've been wanting to replace our outdoor brass light fixtures for quite some time (we're talking years here). Instead of replacing them, we saved money by painting over them with Rustoleum Oil Rubbed Bronze Paint for a fresh new look. See the steps we used to make these last a long time below.
Do you have a light fixture (or any type of brass hardware, really) that could use a budget-friendly update? Rustoleum Oil Rubbed Bronze Paint is our new best friend these days. It's easy to use for a quick update. But, we did take some extra steps to make sure our hard work on these fixtures lasted a long time. See this complete tutorial below.
Painting Over Brass
We have three of these light fixtures across the front of our home: two on either side of the garage and one by the front door.
When we started talking about replacing them, we priced them out around $150 each. I convinced my husband I could totally paint ours...he wasn't so sure I could pull this one off. So, in reality, this project was born out of the fact that I just had to prove him wrong.
Using Rustoleum Oil Rubbed Bronze Paint
Project Supplies:
- Rustoleum Oil Rubbed Bronze Spray Paint (I used two cans for three light fixtures)
- spray paint primer
- clear spray paint sealer (I prefer a satin or matte finish)
- cleaning supplies
- multipurpose cleaner
- old toothbrush
- rags/paper towels
- cardboard or drop cloth
- old styrofoam (optional, but handy for holding screws in place to paint them)
Directions:
- Before taking your fixtures a part and down, be sure to turn off the power source for your lights. If you don't have any prior experience with electrical connections, you may want to call someone who does.
- After removing your fixtures, you'll want to completely take them a part. It's a good idea to either take a video on your phone or lots of photos so you know exactly how to put them back together later.
- We cleaned ours completely and removed all dust and dirt (and bugs!). This is where an old toothbrush and a good multi-purpose cleaner come in handy.

But since I don't touch my light fixtures much (maybe once a year to change the bulbs and clean them), I didn't worry about the sanding on these.
- I sprayed one coat of the primer on everything. I had to be pretty careful to turn pieces over to get every crevice, bar, and screw.

- After the primer completely dried, I busted out the ORB (Rustoleum Oil Rubbed Bronze) paint. This took about three very light coats. You don't want to spray it on too thick or you'll inevitably be dealing with drip marks.
- Use a consistent spraying motion to keep your coats even on all surfaces of the brass.

- For the bolts and screws, I popped them in some leftover styrofoam (I save styrofoam from packages just for these type of projects).
- I used the same "light strokes" painting technique on the bolts and screws.

- After the paint dried, I gave all of the pieces a good coat of the sealer. Then we let everything dry overnight.
- We reinstalled everything the next day and are super happy with the results. Remember to shut off the power to the source when working with wiring and light fixtures. If you don't have experience in this area, you may want to seriously consider calling someone who does.
More Practical Painting Tutorials
- Be sure to check out my complete tutorial on How to Dye Grout (instead of replace it).
- And one of my readers' favorite tutorials is How to Paint Your Porch Floor so it never peels.
- If you love these kind of projects, you'll probably like the Door Knob Painting Video Tutorial over at Renovated Faith.
- And Unexpected Elegance shares a great technique on How to Paint Baseboards.


They look really fabulous! There's quite a few brass items in my home that I'd love to refinish!
ReplyDeletewow. spray paint is miraculous!
ReplyDeleteVery classy update for the porch light and great tutorial!
ReplyDelete-Amberly!
Fabulous idea!
ReplyDeleteNancy
Love the bags Kristi! Wow, those lights look great! Brand new!
ReplyDeleteThey look so much better. I spray painted our brass ones black last year when we moved in.
ReplyDeleteKristi - Those turned out very well. I have had good luck with the ORB paint. Love it.
ReplyDeleteJudy
Wow Kristi - that turned out SO GOOD! I think Brass should be outlawed! Unfortunately, so many houses are full of it!!! When we were buying our house, the number ONE criteria when we were house hunting was NO BRASS! No knobs, hinges, lights - NOTHING! Thank goodness we found one with all brushed nickel!!! Score!! Great job. I have a can of that exact oil rubbed bronze spray paint. I spray painted my house numbers and am thinking of spraying the handles of my front door also. What do you think?
ReplyDeleteYou go, Kristi! Nice job!
ReplyDeleteVery nice, Kristi! They all look great. Alex did our towel rods and toilet paper holder and I really love the look. I am literally looking around the house for anything else we can paint. I'm thinking of doing our brass piano lamp.
ReplyDeleteThey turned out very nice! I love the side by side pictures. I am so glad you were able to redo these instead of purchasing new. Sadly I had to replace ours they were just too old. I would much rather repurpose and save the money on something else! I loved the tutorial it's fantastic.
ReplyDeleteMy theory is, I'll wait long enough and the brass will be back in style ;)
ReplyDeleteNope..not in 200 years
DeleteGreat job!!
ReplyDeleteThese look 1000 times better! Yes, I want to paint the light fixture and door hardware on the front door to spiff it up. Maybe that will happen next week. Spray paint is so awesome (:
ReplyDeleteThose looks amazing! I am si putting this on my list of things to do - I hate our late 80's brass!!! Loved seeing the Shaklee out in your tools pic too! :)
ReplyDeleteIt always amazes me what a little bit of paint will do. I love how this turned out!
ReplyDeleteI need to do this to allllll of my builder-grade fixtures that came with our house! Looks great!
ReplyDeleteChrissy @ Everyday with the Jays
Beautiful, now! Thanks for sharing your inspiration with Sunday’s Best – you helped make the party a success!
ReplyDeleteAwesome!This weeks project list included replacing the ugly brass fixtures in my bathroom. You just saved me a bunch of money!
ReplyDeleteI have fixtures almost like this, with the narrow strips of brass surrounding the glass panes. You were able to remove the glass panes? I have been putting this job off at the thought of having to tape/cover the glass..DREAD...LOL
ReplyDeleteThanks!!I have pinned your blog as one of my AWESOME BLOGS to visit!
I plan on doing this to a ceiling fan donated by a friend. Love the idea of putting the screws and such in styrofoam and the steel wool tip!
ReplyDeleteGreat job. I have a can of that exact oil rubbed bronze spray paint.Antique Brass Picture Light
ReplyDeleteI just inherited the ugliest, most gaudy light fixture on the porch of my new house. We just moved, so money is tight. I think I am going to try this out! Thank you. I feel like there is hope without spending tons of money!
ReplyDeleteLoved this so much I started this weekend on one! I used rustoleum oil rubbed bronze with primer. Do u think it's really necessary to seal with poly spray or can I skip? Some tutorials don't say to so I'm not sure. Thanks!!
ReplyDelete