This post for a board and batten tutorial contains affiliate links. I make a small portion when these links are used, at no additional cost to you.
Board and Batten is a great way to give a new place a classic and timeless look. But, it can get a bit expensive. By using a thin underlayment instead of heavier lumber or boards, we achieved this fun look on a very tight shoe string budget. See the tutorial below!
In the summer of 2011, we did our first board and batten project in our hallway bathroom. You can see the post on that here. While it was a nice project and still looks great, it was a bit pricey (we used the Cadillac of lumber...apparently). And, it was very labor intensive. We did things completely different this time...and LOVED the result (and our pocketbooks are super happy, too). See our complete step-by-step tutorial below.
Board & Batten for Less than $30
This is actually the first of several posts over our younger son's bedroom makeover.
He's ready to leave that alphabet quilt in the dust.
And it was toy overload. I think we outgrew that little bookshelf about three birthday party hauls ago.
How to Create the Board and Batten Look for Less
Supplies:
- underlayment boards, cut to space (more on that below)
- sandpaper in a variety of grits
- Liquid Nails
- finishing nails
- paintable caulk
- paint
- You'll also need standard tools: hammer, nail punch, saw, etc.
The trick to making this project cheap:
We did NOT use the 1x4 boards like in our bathroom...I wanted a board & batten that was practically flush to the wall in Jonathan's room. I didn't want to worry about having to restrict where we'd hang artwork or place a headboard. I wanted to be able to hang pieces on top of the board and batten...from the wall above. And technically, most of us DIY board & batten folks aren't creating true board & batten...which is a siding style in which boards cover seams to create the board and batten pattern that we've all fallen in love with.
- After chatting with our Home Depot guy, we arrived at: 5 MM 4x8 Underlayment (technically....insulation, if you will). But, it worked wonderfully for this. It took paint, it cut well and nailed flush to the wall. It did require more sanding...but that was a bridge we were willing to cross.
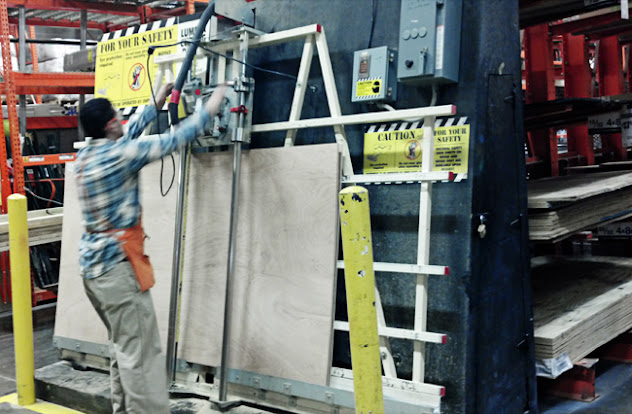
Since these were 4'x8' sheets, we had Home Depot cut them down into strips for us (we used two sheets total). This was a HUGE time saver...and it's free, so why not take advantage of this delightful cutting service?
- Our boards were cut into five foot lengths (that's how tall we wanted them).
- And then they were cut four inches wide.
- In the three-foot sections that were "leftover", we had Gus (our awesome and patient Home Depot guy) cut them into four-inch strips, too. Then we used the shorter strips for the horizontal pieces. We didn't waste any of it!
These were what the strips looked like once cut. And here's the bar code if you're looking for this product.
Directions:
- There was LOTS of sanding to get these smooth...they were quite rough when we started. This was the trade off in using cheaper materials.
- I started with a course sand paper and worked my way down to a finer grit...this definitely took some time, but it's worth it.
- We used a vertical board as a guide to figure out where to place the top horizontal board.
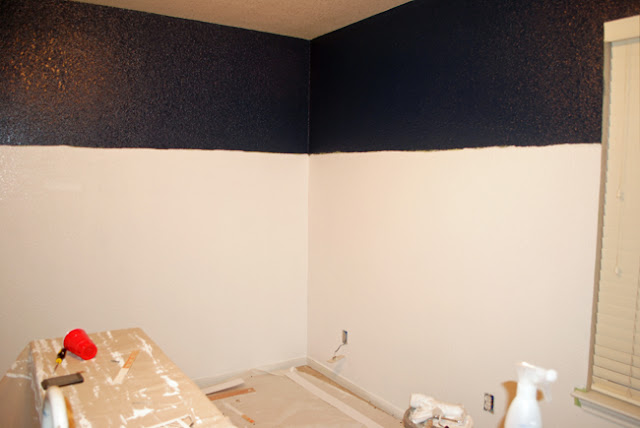
- We pre-painted the top of the wall to make it easier.
- This blue is Twilight Chimes (#560F-7) from Behr.
- We also pre-painted the top horizontal boards before nailing them in place...to avoid having to cut in later on. This was also a major time saver.
And then we painted the bottom portion of the walls with Behr's Frost (swatch #1857).
- The first boards to go up were those pre-painted horizontal boards...around the entire room.
- We again just used a vertical board and the level to put them in place.
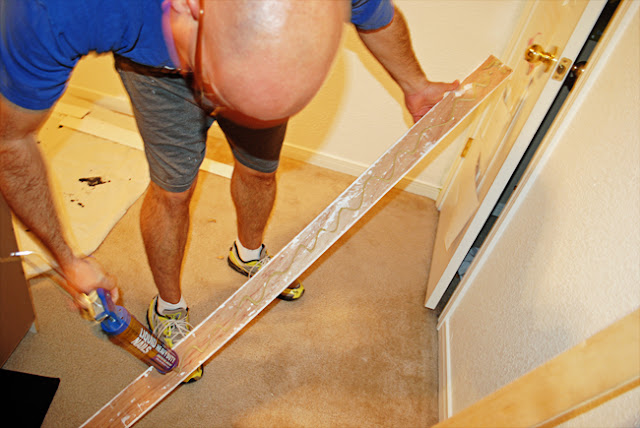
- Then used a dab of Liquid Nails and finishing nails to get it in place.
- Then we started in on the vertical boards. Since we were doing the entire room (all four walls), we spaced them 18-inches apart (from the farthest side of the previous board).
- Again, Liquid Nails, followed by finishing nails.
We used a nail punch to sink all the nails (pictured above). This is important for a smooth end result.
- Once a nail is sunk, you can fill it with putty, smooth and sand and then paint for a flawless finish.
- It looks tidier than having random nail heads everywhere. Plus, it's a lot smoother to the touch.
- Since we didn't have Home Depot cut our smaller horizontal slats (they weren't all perfectly the same sizes since we turned corners, etc.), we did pull in our miter saw to cut those.
- I'm proud to say that I did all the cutting by myself on those.
- The horizontal cross strips were just an extra touch to give the project a bit more dimension.
- You can skip this step if you prefer (or if you're worn out!).
- I cut a template board (pictured above) so each horizontal board would be spaced from the top bar the same as the next.
- It's not actually attached here...just wedged so it stuck!
Once all of the horizontal boards were Liquid Nailed & finish nailed into place (and the nails were sunk)...then the fun really began.
- Filling. Ohhhh....filling. Such a necessary evil. I stayed up until 3 a.m. one night to just knock it out. It was pure misery. It's just an absolutely mundane task that has to be done.
- Don't skip this step just because it's so utterly annoying...it definitely adds a lot to the look of the finished product. In fact, the project would look quite unfinished without the filling step.
- I use both spackle (or DryDex) for the nail holes and then paintable caulk (pictured above( for the spaces where the boards meet the walls. I like to use these tubes versus the caulk gun because I feel like this gives me a bit more control.
- I also prefer the paintable caulk with latex instead of just clear silicone. The clear silicone dries clear and often times, I end up re-caulking the same spot because it's clear and I can't see it. But the kind with latex dries white...making it easier to see.
- I like to pay special attention to the corners when filling...just to get that seamless look.
- After it's all caulked and filled, I went over everything with sandpaper one more time...just to get a smooth finish.
- I used a wet cloth (sometimes I use tack cloth...but I got lazy after the 3 am caulking party for one) to clean up all the sawdust.
Then...paint the board and batten!
Annnnnnnnd.....done.
- This is a really cost-effective project with big impact.
- The $30 up front cost (in 2013, keep that in mind) did not include the paint on this project...just the components of the actual board and batten (caulk, nails and underlayment).
- We had sandpaper and putty already on hand. We actually had the white paint also (and all of our painting tools/drop cloths on hand)...so we only had to purchase one gallon of the navy paint in addition to the board and batten stuff. Even with our navy paint purchase, the grand total was still less than $50.
UPDATE 02.10.15:
Here is what the room currently looks like. See all of its fun details here.
More DIY Projects
- I love this tutorial from Family Handyman for How to Add Glass to Cabinet Doors. I've always loved that look!
- My DIY Crate Tutorial is my #1 tutorial here on the blog (it's also an oldie from 2012). These are so fun for storage in a small space.
- And our DIY Bathroom Floating Shelves are a great project for any skill level.
- I really love this DIY Floating Ladder Shelf from Annika's DIY Life.
- If you have open soffits in your kitchen, this tutorial for How to Enclose the Space Above Cabinets from Simply 2 Moms is a great one to keep on hand.


What an awesome idea! Can't wait to see how this room will turn out!
ReplyDeletethis is sooo awesome. I love the subtle visual interest it creates. This might be one of those perfect projects for the upstairs landing. Or maybe the bathroom. pinning either way. love it if you shared at my link party ;) http://www.addhousewife.com/2013/01/its-pininspiration-2013.html
ReplyDeleteGreat job!! I love all the handiwork that went in to doing it yourself!
ReplyDeleteI was trying to explain this exact project to my husband the other day (for our living room). I don't know what part of it he wasn't getting, but he finally understood how easy I was trying to make it sound. I wish I could have just showed him your post and it would have saved about 30 minutes of "discussion" time. LOL! I hadn't thought of the caulking part, but it looks like it's necessary. Thanks for sharing this!
ReplyDeleteI love this project!! So cool and looks pretty easy!! I am hosting a new Pinterest Power party and would love for you to link up this and any other projects that you have!!
ReplyDeletehttp://www.thetaylor-house.com/2013/01/10/pinterest-power-party-1.html
Chrissy
WOW!!!! This looks fabulous & I can't wait to see what else you've got to share with us!
ReplyDeleteGreat idea!
ReplyDeleteSo cool! Thanks for sharing such great details. Sometimes it's tricky to finish a project, and snap shots of the process. Great budget bender. =)
ReplyDeletelove it. doing board and batten in every room of my house is on my to-do list! thanks for sharing how you cut costs even further for a great DIY project!
ReplyDeleteYou are a rock star! But man alive, that filling and caulking looks like a bear. Good job though the finished result is fabulous. If you get a chance this weekend, I would LOVE for you to link up at Get Schooled Saturday at Too Much Time On My Hands
ReplyDeletexxx
Kim
http://too-much-time.com/2013/01/get-schooled-saturday-56.html
Stopping by from TT&J - This looks amazing! Thanks for the tips and tricks. I would love to do this down our hallway.
ReplyDeleteLooking good so far, Kristi!
ReplyDeleteVisiting from Tatertots & Jello :) We also recently installed board & batten in our daughters room. She INSISTED on a second horizontal row (she's almost a teen...sigh) and I like yours SO much better ;)
ReplyDeleteI love how you did this. I'm doing this next time we do board and batten! I am fearturing this at somedaycrafts.blogspot.com
ReplyDeleteFantastic!
ReplyDeleteThis looks amazing ! Thanks for sharing. I'm sending it to my husband right now... Next project?! Maybe I should let him finish the cabinets in the laundry room first?
ReplyDeleteDang girl! This is fantabulous! I'm looking around my house right now thinking where can I do this....I am so anxious to see what you end up doing with the room - Reece {my six year old} is a BIG Star Wars fan and I could use some inspiration ;) Pinning! Thanks for sharing Kristi!
ReplyDeleteThat is a great idea for a quick and easy (or relatively easy) new look. Who did you ask at Home Depot to do your cuts? I asked at my Home Depot and they will only do rough cuts, and one per piece.
ReplyDeleteI have the same textured walls and have been so hesitant to try this, but you have inspired me! It looks absolutely fabulous! We have a Star Wars room for my oldest and he loves it! Great start, Momma!
ReplyDeleteJen @ Noting Grace
Amazing! I have been wanting to try this so badly...I think I can manage this and the price is GREAT!
ReplyDeleteWow! I think I can do this too. Thank you for sharing. :)
ReplyDeleteI have always wanted to do this! Thanks for the awesome tutorial! It turned out so nice. :)
ReplyDeleteIt looks beautiful! I'd love to try this in my kitchen :) Thanks so much for sharing at Mix it up Monday!
ReplyDeleteWow, that looks awesome! I can't believe what an impact that makes and that you only spent $30. That would make me giddy. :) Saw you featured at the Artsy Girl Connection. :) Sharon
ReplyDeleteI love it! The fact that is almost flush to the wall and the price, makes me consider doing it to my room! Thanks.
ReplyDeleteIt's amazing you were able to do so much for so little cost, great job! :)
ReplyDeleteThis is a great job! Well done and I think I will do this instead of painting the whole wall a dark color! I will reference you in my blog!
ReplyDeleteLove this! Thanks for all the details and tip about the other wood. Two questions - what size nails did you use? And did you worry about hitting studs since you also used liquid nails? Thanks!
ReplyDeleteIt looks so great. We recently did our basement in board and batten and use the prefinished boards. I know what you mean about the picture hanging and it is a lot more expensive. I had not thought about having the store cut the strips. I am surprised they would actually take the time to do that!! The sanding does sound like it could be monumental. I agree, the caulking and nail holes are a real trial to get done. In fact, I still have some calking and touch up to do and it has been a year! ;) Thanks for sharing, it really looks like it will a very sharp bedroom. Blessings, Linda
ReplyDeleteI love your cheaper version! Pinning for future reference!
ReplyDeleteIt looks awesome!
ReplyDeleteHoly cow Kristi - that is AWESOME!!! Pinning it. Great job! :) Claire
ReplyDeleteI want to do this to every wall in my house, you did a fabulous job. My walls have the same texture, please tell me what you used to paint yours? I painted the smallest bathroom in my house & it took an insanely long time. I'm too traumatized to paint other rooms now lol
ReplyDeleteYou have no idea how happy I am to find this tutorial! I will be doing board and batten in a room soon and I too want the boards to be more flush with my existing floorboards. I kid you not...I was just at Home Depot today and saw the very same sheet of underlayment and was wanting to buy it but wanted to see if anyone had used it before! I'm SO, SO, SO thrilled to see that yours turned out amazing...and I'm okay with the sanding because I'm on a tight budget!
ReplyDeleteThank you so very much for sharing this. I'll be featuring my finished project soon...hopefully...and will credit your blog with helping me to make my decision!
Jessica
myworldmadebyhand.blogspot.com
Did the underlayment paint well or did the wood grain show through?
ReplyDeleteLooks great! We just finished up doing a similar project and we left the textured wall instead of adding boards. It looks great and I don't mind not having the traditional boards behind the battens.
ReplyDelete